Fixing the BMW e46 Valve Cover Gasket
If you’re looking to fix the valve cover gasket on your BMW E46, you’ve come to the right place. This blog provides expert advice, step-by-step instructions, and helpful videos—all in one place. Whether you’re a DIY enthusiast or a first-time mechanic, we’ll show you how to replace the valve cover gasket at home, and help you find the best tools and equipment needed for the job.
Time to complete
Hours
0
Topics Covered
-
BMW E46 valve cover gasket -
BMW E46 valve cover gasket replacement -
How to replace BMW E46 valve cover gasket -
BMW E46 oil leak fix -
BMW E46 rocker cover gasket -
BMW E46 valve cover removal -
DIY BMW valve cover gasket replacement -
BMW E46 oil leak -
BMW E46 valve cover bolts -
BMW E46 misfire
Tools & Parts
Overview of the Job:
By replacing your own valve cover gasket (also known as the rocker cover gasket), you could save yourself hundreds of dollars in mechanic fees. This is a relatively simple job and a great opportunity to learn more about your car. It can also give you insight into your engine’s health—such as the condition of the oil—and even allows you to inspect the spark plugs in the process. In fact, this job is very straightforward on an inline 6 engine like the BMW E46’s M54 engine.
Symptoms of a Faulty Valve Cover Gasket:
Here are some common issues that may result from a failing or failed valve cover gasket:
-
Rough Idling: If your engine is idling roughly and the revs are unstable, this could be due to a vacuum leak. When air enters the system where it shouldn’t, it throws off the pressure balance. The ECU (engine control unit) tries to compensate, but it can’t maintain a steady idle.
-
Burning Oil Smell: Another sign is the smell of burning oil inside the cabin. This can happen when oil leaks onto the hot engine and burns, with the fumes being drawn into the air conditioning system—especially since the vents are located directly above the engine.
-
Misfires or Spark Plug Issues: A leaking valve cover can allow oil to seep into the spark plug wells. This can cause intermittent misfires or even complete spark failure. If left unchecked, this can lead to more serious and costly engine problems.
Before You Start: What You Should Know:
Starting the job on a car that is now 23–27 years old can come with some challenges. Plastic clips and parts are likely beginning to fail due to heat and age—over time, these parts become brittle. If you break any part, feel free to comment, and I’ll help you find a place to buy a replacement.
Also, remember: cross-threading and over-tightening can be a nightmare to fix and might even make your car not worth repairing compared to its value. Be careful and take your time. Four hours is not a target—take longer if needed, and always take breaks to think things through. The biggest disasters usually come from not thinking things through.
Get Started Fixing E46 Valve Cover Gasket
To Start Take off the plastic Engine Splash Shield. This Cover is there to help with reducing engine noice and making the engine by more appealing to look at. This cover is will be held in with two 8mm Nuts, placed right onto of the engine hidden Behind the 2 Covers striped silver. Once this cover has been remove you should see the 6 Coil pack the power the spark of the machine

Once the BMW E46 engine splash shield has been removed, you will see the six coil packs. Start by removing the coil packs one by one. Use a 10mm socket and carefully loosen the bolts by turning them anticlockwise. There will be 12 10mm bolts in total, which you’ll need to keep safe.
The coil packs may look different depending on your car’s model. Some may be round, while others are square. If you have a mix, as shown in the image, it likely means a coil pack failed in the past and was replaced with a newer or older version. The square-style coil packs are the newer design, while the round ones are the older type.
Keep the coil packs and lay them out in the order you removed them—1, 2, 3, 4, 5, 6. Even better, label them with a Sharpie. This help you elevate any problem and helps you narrow things down in the future incase of the event of a failing coil pack.
To disconnect the wire connected to them pull up on the metal connector until it slides up then remove the cable
Once you have removed the coil packs, check for any signs of oil or moisture on the tips, or any cracking in the rubber. These can be early warning signs—even if the coil pack is still working—that the cylinder is likely to fail in the near future.

Once the coil packs are out, you’ll want to switch to an 8mm socket and remove the grounding wires. These nuts are shown by the red arrows and should be kept safe—you don’t want to make a last-minute trip to the hardware store.
Now that the ground wires have been removed, I’d advise you to unclip the coil pack harness. This is the set of cables you just disconnected from the coil packs. Unclipping it is easy: gently pull up on the plastic bar underneath. A clip may break in the process, but that’s to be expected—don’t panic, it’s not a major issue. Once removed, place the harness somewhere out of the way.
That should be it for our little 8mm friend.
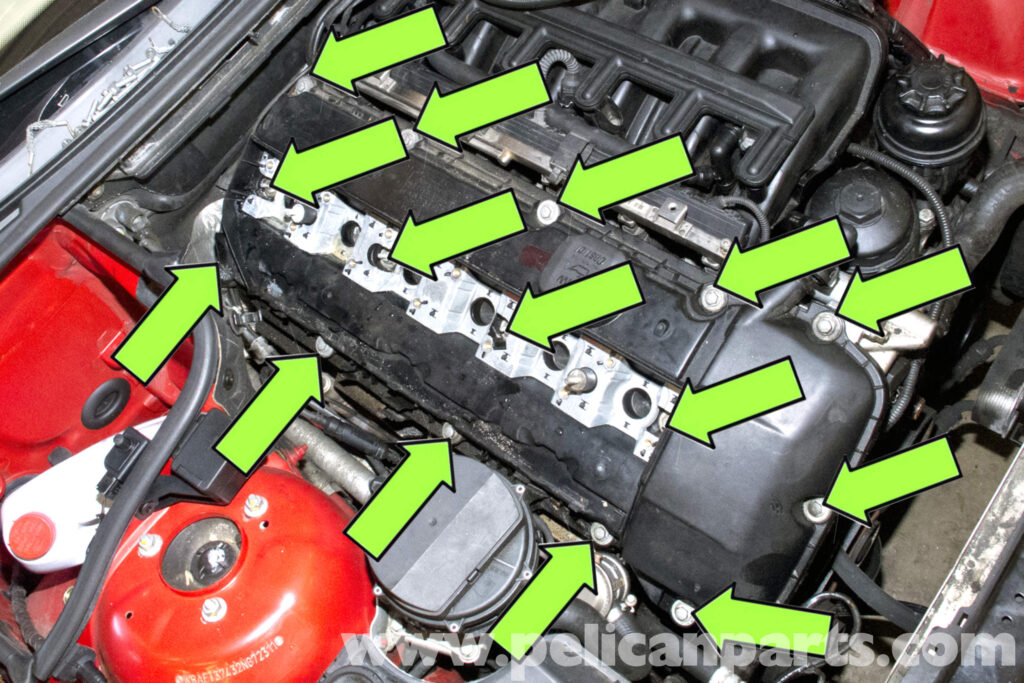
To remove the final bolts holding in the valve cover, start by removing the center bolts first. There will be four 10mm bolts with threaded studs sticking out. Remove these and set them aside safely—you’ll have a hard time finding replacements without buying OEM parts.
Now carefully remove the outer 10mm bolts holding the cover on. Do this in a criss-cross pattern (e.g., top left to bottom right, and so on) to avoid warping or uneven tension.
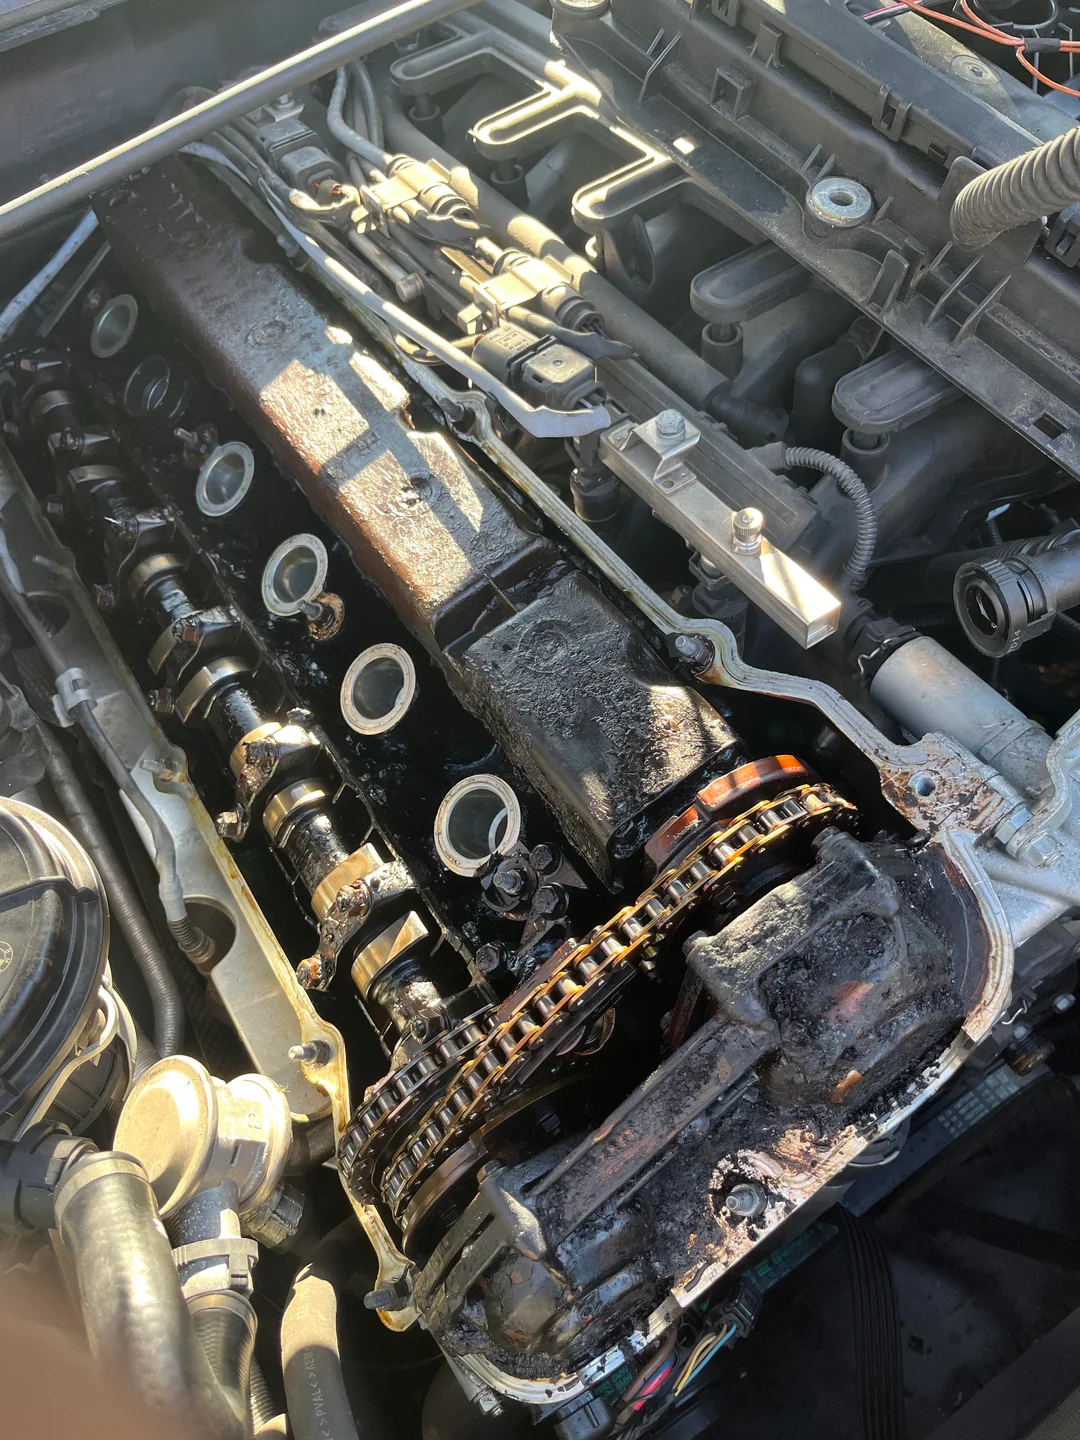
Once all the bolts have been removed, disconnect the VANOS hose connected at the top right of the valve cover. Now slowly pull up on the valve cover—it may require some force if it hasn’t been removed since the factory. Place the cover somewhere safe where oil won’t leak onto your carpet or driveway.
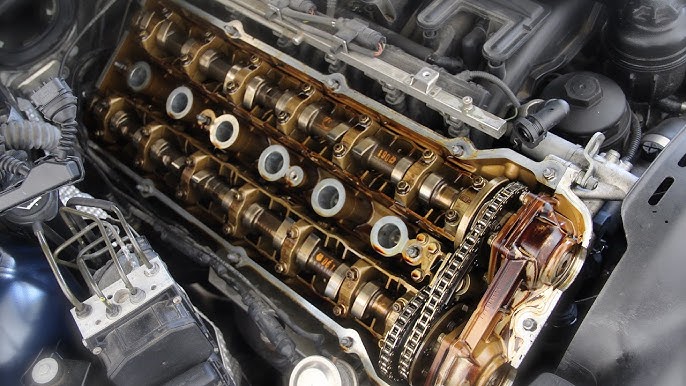
If you’ve made it this far—congratulations! Now check the inside of the engine and look for anything suspicious, such as burnt, crusty oil or even metal shavings. If you see crusty oil, it’s not a major issue, but it is a small sign of concern—you might as well clean it up while you’re in there. However, if you see metal shavings, that’s a serious issue and may require further investigation.
To prepare for applying the new gasket, wipe away any oil from the edges of the metal around the engine. Take your time and give your car the care it deserves—by doing this, you’re going above and beyond for your vehicle.
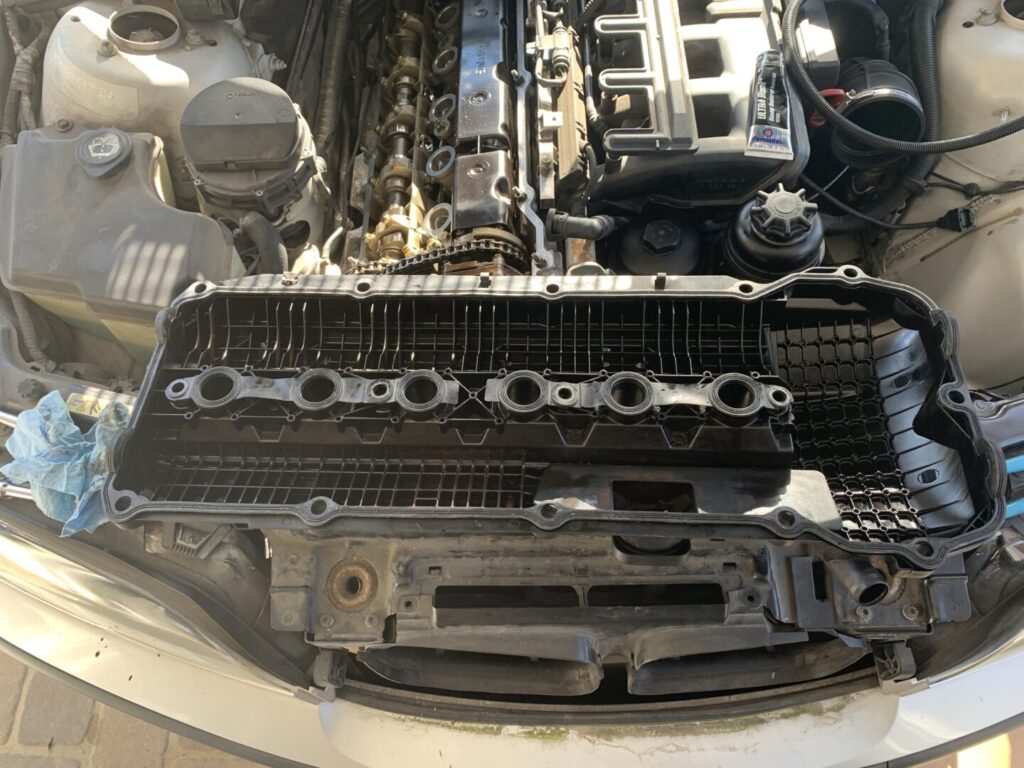
Remove the old gasket. This gasket may be brittle due to age—or, if you’re lucky, still soft and easy to remove. Start by removing the inner spark plug gaskets; just pull up on the gasket.
Now do the same for the outer gasket. Pull up gently—this one can be tricky, as the plastic at the back tends to get stuck on the gasket, and pulling in the wrong direction can cause it to snap off. Plastic! This will be a recurring theme with this car—plastic, plastic, plastic.
Now apply the new gasket in the same order you removed the old one, making sure it fits properly into the grooves.
Are you ready? It’s time—let’s reinstall everything.
Start by carefully placing the valve cover back onto the engine block. Make sure the gasket doesn’t come loose or get pinched underneath anything. Trust me, this is a common mistake—I’ve done it myself. One of the spark plug gaskets slipped off during reinstallation and caused misfiring and an oil leak disaster.
Begin by reinstalling the 10mm bolts around the valve cover. Basically, everything we’ve done so far is now done in reverse.
Tighten the 10mm bolts finger-tight first, then give each one a quarter turn (from 12 to 3 on a clock) to fully tighten. Always tighten in a criss-cross pattern to evenly seat the valve cover. Be extra careful not to cross-thread the bolts—I’d recommend starting each one by hand until you’re confident it’s threading in smoothly.
Final Steps & Starting the Engine
Once all the bolts are tightened correctly and you’ve double-checked that the gasket is properly seated, reconnect the VANOS hose at the top right of the valve cover.
Now, plug the coil pack harness back in by gently pressing down the plastic bar until each connector clicks into place. Reinstall the grounding wires using the 8mm socket, tightening each nut securely. Then, reinstall the coil packs in the exact order you removed them (this is where labeling them earlier really pays off). Secure each coil pack with its two 10mm bolts.
Finally, reattach the engine splash shield underneath the engine bay, if removed. Do a final visual inspection—look for any loose parts, tools left behind, or anything that might obstruct a clean engine start.
Time to Start the Engine
Start the engine and let it idle. It might run a little rough for a few seconds as the ECU adjusts. Let it settle and keep an eye out for:
-
Unusual noises (clicks, knocks, or hissing)
-
Check engine light (a misfire might mean something wasn’t connected properly)
-
Oil leaks around the valve cover gasket
If everything looks and sounds good, congratulations—you’ve successfully changed your valve cover gasket!
Final Tips
-
Drive the car for a few days and check again for oil leaks, especially around the edges of the valve cover.
-
If you’re still getting a misfire, double-check your coil packs and make sure the spark plug tubes are dry and clean.
-
Consider resetting the ECU or clearing any check engine lights using an OBD2 scanner.
References
Engine Bay: Reddit – The heart of the internet. (2015). Reddit.com. https://www.reddit.com/r/BMW/comments/qnecly/trying_to_clean_up_the_engine_bay_little_by/
Coil Packs: 2001Silver330CI. (2021, December 2). Three Different Brands Of Ignition Coils Under The Hood. E46 Fanatics Forum. https://www.e46fanatics.com/threads/three-different-brands-of-ignition-coils-under-the-hood.1299742/
Valve Cover Bolts: BMW E46 Valve Cover Removal | BMW 325i (2001-2005), BMW 325Xi (2001-2005), BMW 325Ci (2001-2006), BMW 325ti (2001-2004) | Pelican Parts Technical Article. (2024). Pelicanparts.com. https://www.pelicanparts.com/BMW/techarticles/BMW-3-Series-E46/16-ENGINE-Tackling_Your_Valve_Cover/16-ENGINE-Tackling_Your_Valve_Cover.htm
Valve Cover: Lam, S. (2023, October 22). Valve Cover Gasket Replacement: BMW E46 3-Series – The Track Ahead. The Track Ahead. https://thetrackahead.com/projects/bmw-e46/valve-cover-gasket-replacement-bmw-e46-3-series/
The 50sKid
If there’s anything your going to learn with your e46 the 50sKid is known among the community as a god
He has done a video basically on everything to do with the e46
https://www.youtube.com/watch?v=qWgMrJcww_Y
Other Videos
https://www.youtube.com/watch?v=wkF7TI8uItAhttps://www.youtube.com/watch?v=Mc7EXVuY6Qwhttps://www.youtube.com/watch?v=IbWYRvnb6MYhttps://www.youtube.com/watch?v=GR_krqKVAAohttps://www.youtube.com/watch?v=7WFbrWY6oaw